Monday, November 26, 2012

Happy Friendsgiving!!!

Thanksgiving is, by far, my favorite holiday of the year. Why? The food, of course!

Having ditched my birth family years ago, I don't have "family obligation" holiday meals to suffer through which means I get to cook everything myself, exactly the way I like it. Now, despite the fact that I had to work on Thanksgiving Day and was too tired to come home and cook anything- let alone the full monty- this year was probably the best Thanksgiving I've had in years because I was able to share it with friends... and my friends are more important to me than pretty much any of the folks out there with whom I share a genetic link. You see, I am of the opinion that family is what you make of it... and I have a pretty cool family, if I do say so myself. And I'm pretty sure Kailan would agree with me since he had an awesome time playing- and begging for food- with his friend Tater Tot. :)

So what did we eat? Well, I spent a chunk of Saturday getting a jump start on the Friendsgiving Day feast I had planned, so to that end, I made a salted caramel apple pie (mostly) from scratch which was a first for me. Because I really don't enjoy making pastry dough, I see nothing wrong with using the pre-made, refrigerated pie dough. However, that doesn't mean I can't make the filling myself (no canned pie filling here!) and it was surprisingly easy.

Salted Caramel Apple Pie

salted caramel apple pie... all that was left
Peel and core 6 cups of apples (I used a mix of granny smith and golden delicious) and slice into 1/4" pieces before tossing them with 2 Tbs. of fresh lemon juice. Meanwhile, in a large heavy bottomed sauce pan over medium-high heat, cook 2/3 cup of sugar until it melts and turns dark amber, swirling occasionally, about 8-10 minutes. Remove from the heat and add 6 Tbs. of butter and 1 Tbs. of heavy cream, swirling to combine. Return the sauce pan to the stove over medium heat and add the apples, stirring to coat in the caramel. Cook the apples until softened, about 3-5 minutes and remove from the heat once more before stirring in 2 Tbs. of AP flour and 1 tsp. of sea salt. Set aside to cool. Preheat the oven to 425 degrees. Remove the pie dough from the fridge and bring to room temperature while the oven is preheating, about 15-20 minutes. Once the dough is room temperature, press one crust into a 9" glass pie dish before dumping in all of the apple mixture. Top with the remaining crust and cut several slits in the top to allow the steam to escape during baking. Now, I like to put my pies on a baking sheet for easier handling as well as to catch any drips if the pie bubbles over while it's baking... but you don't have to. Although, I'm pretty sure you're an idiot if you don't, but whatever. Put the pie on the middle rack and lower the heat to 375 degrees. Bake at 375 degrees for 35-45 minutes, until the pie is golden brown. You may need to cover the pie crust with foil in the last 10-15 minutes of cooking to prevent over-browning, but surprisingly, I didn't need to this time. Cool the pie for at least an hour before cutting into it and enjoying the salty sweet goodness. Mmmmm....

In addition to the pie, I also made (vegan) sweet potato gnochi which was a first for me. Because I wanted to make sure they would be a success, I needed to do a trial run with them first so once I made the dough, I cooked up a small batch- definite success!- and ate them for dinner. Again, these were surprisingly easy to make, although I have to admit that I'm not a fan of working with sticky dough and these certainly fell under that heading.

(Vegan) Sweet Potato Gnochi

vegan sweet potato gnochi dough
Bake 2 pounds of whole sweet potatoes (2-4 potatoes, depending on size) in a 425 degree oven for 45-55 minutes until fork tender. Set aside until cool enough to handle then slice the potatoes in half lengthwise and scoop out all of the flesh into a large bowl, discarding the skins. While the potatoes are still warm, mash them (I just used a fork) with 1 tsp. of salt, 1 tsp. of nutmeg, and 1/2 tsp. of black pepper. Once the sweet potato mash has cooled, stir in 3-4 cups of AP flour in 1/2 cup increments, stirring after each addition until the dough reaches a rather sticky consistency but comes together to form an actual dough. (I think I used a little more than 4 cups, actually.) Once the dough comes together, divide it roughly into 6 parts. On a floured surface, roll out each part of the dough into ropes about 10-12 inches long and about 1/2 inch in diameter. I can't stress this part enough: Make sure you've got plenty of flour on your work surface AND your hands because this shit is sticky! Flour a knife and cut the ropes into 1 inch pieces, pressing each piece gently with the tines of a (floured!) fork to make decorative ridges.
... sauteed in vegan butter
Once the gnochi are formed, you can either cook them right away or store them in the fridge (for up to 3 days) or in the freezer (for up to 1 month). To cook them, bring a large pot of heavily salted water to a boil. Dump in about 20 gnochi at a time and reduce the heat to a simmer, cooking the gnochi until they float to the top, about 4 minutes. Transfer the floating gnochi to a separate pan over medium heat and saute them in butter (or vegan butter as the case may be) with your favorite herbs (I used sage and thyme), turning them every minute or so to brown/crisp all sides. It's a bit of a process having to cook them in batches, but it's totally worth it...

So the rest of the meal, I put together on Sunday. To ease myself into it, I started with my favorite cranberry sauce which is more like a relish or chutney: Bring to a boil 1 bag of whole cranberries + 1 cup each of sugar and water (I actually use apple juice) and 1/2 tsp. cinnamon. Once the berries start popping, reduce the heat to medium-low and simmer until most of the cranberries have popped and the sauce has thickened, about 15-20 minutes. Cool before serving.

roasted turkey breast, already carved
Keeping in mind that I had carnivores, vegetarians, AND vegan guests coming, I only had to make a few small adjustments to keep the majority of the dishes suitable for everyone. Of course, there's no way to veganize actual meat, so the herb roasted turkey breast and whole roasted chicken were the (tasty) exceptions to that rule. Oh, and my traditional sausage-bread stuffing with dried cranberries was the other exception, but I also made a vegan version with mushrooms and pecans which turned out pretty damn good if I do say so myself.

sausage stuffing, green bean casserole, vegan stuffing
In addition to the stuffings (yes, I still call it "stuffing" instead of dressing even though the only thing it's stuffed in is a casserole dish), I also made chunky mashed potatoes (skins still on- I don't peel potatoes) with parsnips, veganizing them with vegan cream cheese and butter, plus a whole bunch of fresh herbs. There was also a green bean casserole (not vegan) as well as the more vegan friendly version of sauteed green beans with mushrooms and onions. To round things things out, I also roasted some chunks of butternut squash and fresh Brussels sprouts, both simply dressed with a little vegan butter and salt & pepper. Nothing terribly difficult to make, but juggling the timing of everything was a little challenging and dinner started about 45 minutes later than I had originally planned.

Eh. No big.
(vegan) sweet potato gnochi, roasted butternut squash
roasted Brussels sprouts, vegan sauteed green beans, vegan mashed potatoes & parsnips

And, because I was feeding a dozen people, it was easier to just put all the dishes out buffet-style so everyone could help themselves before getting comfortable and settling in the living room to eat while watching football. See? And you thought Friendsgiving wasn't the same as Thanksgiving...
vegan mixed berry crisp... again, all that was left...


After food and drink, there was even more drink and games (Apples to Apples and Scattergories) before we dove into dessert: salted caramel apple pie, (vegan) mixed berry crisp, and pumpkin cheesecake (an oft-requested specialty of one of my guests).

A good time was most definitely had by all... the only downside being that there weren't nearly enough leftovers for me to enjoy the rest of the week! ;)

Tuesday, November 20, 2012

Veggie Pot Pie

Pot pie is another one of those comfort foods that I like to make every couple of weeks. Not only is it yummy, but it's easy to switch things up flavor-wise and make it with pretty much any vegetable and protein combination I've got on hand. Plus, it's pretty hassle-free because I like to use refrigerated pie crust... which also makes it easy to throw together either a full-size dish to share, or a single-size casserole like today's version. Truth be told, I kind of prefer making this smaller version because the crust just seems to turn out better, and you're pretty much guaranteed a bite of crust with each forkful. ;)


Veggie Pot Pie

Ingredients:
1 Tbs. olive oil
2 Tbs. onion, diced (you guessed it- straight from the freezer!)
1/2 tsp. herbes de provence
1/2 tsp. dried thyme
pinch of garlic powder
salt & pepper to taste
4 ounces mixed vegs (again, straight from the freezer)
1 Tbs. AP flour
1 1/2 cups vegetable stock
protein of choice, pre-cooked: chicken, turkey, beef, tofu, beans
1 refrigerated pie crust

Directions:
Preheat oven to 400 degrees.

Remove pie crust from the fridge and set aside to come to room temperature, about 15-20 minutes.

Meanwhile, in a large saute pan over medium-low heat, cook the onion and all spices in olive oil until slightly softened, about 2-4 minutes. Stir in the mixed vegs and continue cooking for another 2 minutes or so until defrosted and starting to warm. Sprinkle on the flour and cook for another minute before adding the vegetable stock. Bump the heat up to medium and stir the veggie mixture until thick and bubbly, about 7-9 minutes. Stir in your protein of choice (I went with cannellini beans today) and set aside to cool slightly.

Unroll the pie dough and cut it to fit the casserole dish of your choice. (Because I decided to use an individual-size dish, I cut the rest of the dough into strips, sprinkled it with cinnamon & sugar, and spread them out on parchment paper to bake alongside the pot pie.) Spoon the veggie mixture into the casserole dish, cover with pie dough, making sure to cut several vent slits in the top to allow the steam to escape. Bake at 400 degrees until the crust is golden brown, about 8-10 minutes. Allow to cool slightly before breaking into the creamy goodness.

Enjoy!

Sunday, November 18, 2012

(Vegan) Mixed Berry Crisp

Okay, so this recipe was based on one from my good ol' standby reference cookbook, Better Homes & Gardens New Cookbook. The original recipe is for an apple crisp (which is certainly delicious in its own right!), but I made a few tweaks so that my vegan co-worker would be able to take part in the fruity goodness with everyone else when I brought this to work the other night.

Sorry... no photo to go along with this one. I forgot to snap one before leaving my house and taking it to work, and of course there was NOTHING left when my co-workers were done with it. :)

(Vegan) Mixed Berry Crisp


Ingredients:
(for the filling)
6 cups of mixed berries (I used what was already in my freezer: blackberries, raspberries, blueberries, and sliced strawberries)
4 Tbs. sugar
3 Tbs. AP flour
1 tsp. vanilla extract
pinch of salt

(for the topping)
1/2 cup old fashioned rolled oats
2 Tbs. AP flour
2 Tbs. whole wheat flour (or you could omit this and just use 4 Tbs. of AP flour, but I like to split the difference)
3 Tbs. brown sugar
1 Tbs. ground flaxseed
pinch of salt
1/2 tsp. spice of choice: cinnamon, nutmeg, or ginger are all good here
4 Tbs. of non-dairy butter, chilled
1/4 cup walnuts, chopped (optional)

Directions:
Preheat oven to 375 degrees.

In a large bowl, toss the berries (the original recipe says to defrost them first, but I didn't bother) with the sugar and flour, stirring to coat before adding the vanilla and pinch of salt. Set aside.

In another bowl, stir together the oats, flour, brown sugar, flaxseed, spice, and salt. Using a fork (or a pastry cutter) cut in the non-dairy butter until the mixture resembles coarse sand with pea-sized chunks of the butter. Stir in the nuts if using.

Pour the berry mixture into a glass baking dish (I didn't bother to spray or butter mine) and top with the crumb mixture. Place the dish on an aluminum foil covered baking sheet (to catch any juice that may spill over, thus causing a big mess in your oven... duh), and bake at 375 degrees for 35-55 minutes, until the berries are hot and bubbling and the topping is golden brown. Why such a varied cooking time? Well, if you use fresh fruit or frozen that's been defrosted, it only needs about 35-40 minutes. If, however, you're lazy like me and use fruit straight from the freezer, it needs a little more time to cook. I will caution you to keep an eye on the topping if you use frozen fruit with the longer cooking time: you may need to cover the dish with foil to prevent over-browning. Serve hot from the oven or at room temperature, straight up or with a scoop of ice cream or whipped topping. Yummm...

Enjoy!

Thursday, November 15, 2012

Winter Squash & Chick Pea Stew

Winter Squash & Chick Pea Stew

Ingredients:
1 Tbs. olive oil
1 small onion, diced
1 pound of squash (recommended: butternut or pumpkin, though I'm sure others would work just as well), diced
1 tsp. ground cumin
1 tsp. ground corriander
1/2 tsp. garlic powder
1/2 tsp. dried rosemary, crushed
1/2 tsp. dried thyme
pinch of cinnamon
pinch of nutmeg
salt & pepper to taste
1 or 2 red new potatoes, diced
1 (15.5 ounce) can of chick peas, drained and rinsed
2-4 cups of vegetable stock (depends on your desired texture/thickness)
4-6 ounces of spinach (fresh or frozen)

Directions:
In a large soup pot over medium-low heat, cook the onion and squash (I used butternut squash straight from the freezer and threw a lid on the pot to sort of steam everything) until softened, about 7-9 minutes. Stir in all spices, making sure the squash mixture is well coated in spice before adding the potatoes and chick peas. Stir to combine, then add enough stock to reach your desired thickness, keeping in mind that the potatoes will absorb some of the liquid as they cook. (I used just over 2 cups for a thicker consistency.) Reduce the heat to low, cover the pot, and simmer for 15-20 minutes or until the potatoes are slightly more than fork tender. Stir in the spinach at the last minute, adjust the seasoning as desired, and simmer for another few minutes until the spinach has wilted but still retains its bright green color.

Enjoy!

Wednesday, November 14, 2012

Spinach Pies

Spinach and feta being a classic flavor combination (for good reason!), spanakopita, otherwise known as Greek spinach pie, is one of my favorite ways to enjoy it. However. Actually making the dish is not exactly my idea of a good time since it's fairly labor intensive what with the whole phyllo dough thing. Don't get me wrong... I've made it before; I just don't enjoy the process. On the other hand, puff pastry is MUCH easier to work with than phyllo is, and you get that same light and crispy texture to the final dish which makes me just as happy as the original. Now, I try to keep a package of puff pastry in my freezer at all times because it makes for great savory pies, appetizers, AND desserts... but that's another post.


Spinach Pies

Ingredients:
1 Tbs. olive oil
6 ounces of spinach (fresh or frozen, dealers choice)
1 shallot, minced
2 Tbs. sun dried tomatoes, diced
1/2 tsp. garlic powder
1 tsp. dried parsley
1/2 tsp. lemon pepper (or plain pepper)
pinch of nutmeg
pinch of red pepper flakes
3 ounces of feta, crumbled
1 Tbs. breadcrumbs
1 sheet of frozen puff pastry, defrosted
1 egg, beaten with 1 tsp. of water

Directions:
Preheat oven to 400 degrees.

In a large saute pan over medium-low heat, cook the spinach, shallot, sun dried tomatoes, and all spices in olive oil until the spinach is wilted and most of the moisture has evaporated, about 6-8 minutes. Remove from the heat to a bowl before stirring in the feta and breadcrumbs. Set aside to cool.

On a lightly floured surface, unfold the puff pastry and cut into four equal squares. Spoon 2 tablespoons of the spinach mixture onto one side of each square. Using a pastry brush (or your finger), brush egg wash on 2 sides of each square. Fold the pastry squares in half, diagonally, into triangles. Crimp the edges of the triangles together with the tines of a fork, making sure the edges are sealed to prevent the filling from oozing out as the pies bake. Transfer the pies to a baking sheet lined with parchment paper then brush the tops with more egg wash. Bake at 400 degrees for 14-15 minutes, until the pies are puffed up and the tops are golden brown.

Enjoy!

Tuesday, November 13, 2012

Vegetable Beef & Barley Stew

I've said it before and I'll say it again: I love this time of year! When the weather turns cool, all I want to do is make soup because, hello?!, who wouldn't?! As much as I enjoy standing over a simmering pot of something on the stove top, nothing beats the convenience of using a slow cooker... that's if you've got the patience to actually WAIT for the final product some 6 to 8 hours later. Beef stew is really one of those soups that is best when done in the slow cooker, mainly because the cut of meat traditionally used in beef stew is a cheap cut which translates to a very tough cut of meat that benefits from slow cooking at low heat. I suppose if you want to make a quick version of beef stew, you can always use a more tender cut of meat... but why bother? It just won't taste the same. 

Vegetable Beef & Barley Stew

Ingredients:
1 large onion, diced
3 carrots, peeled and diced
2 ribs of celery, diced
2 parsnips, peeled and diced
1 (14.5 ounce) can of diced tomatoes with their juice
1 lb. beef stew meat, cut into slightly larger than bite-size pieces
2 Tbs. flour
1 tsp. salt
1 tsp. pepper
1 tsp. garlic powder
1 lb. red new potatoes, diced
3/4 cup barley
4 cups beef or vegetable stock
2 bay leaves
1 tsp. dried rosemary, crushed
1 tsp. dried thyme
1/4 tsp. ground cloves
1 cup of peas

Directions:
Okay, so I know it's an incredibly looooong list of ingredients, but it really is easy to put this stew together and here's the breakdown:

Step 1: Get your slow cooker out from wherever you keep it hidden.
Step 2: Dump the onions, carrots, celery, and parsnips in the bottom of the slow cooker then cover them with the tomatoes.
Step 3: In a large bowl, toss the beef together with the flour, salt, pepper, and garlic powder until well coated.
Step 4: In a large non-stick skillet over medium-high heat, quickly brown the beef on all sides.
Step 5: Dump the beef into the slow cooker then add in all the rest of the ingredients (except the peas), making sure that there's enough liquid to mostly cover the ingredients.
Step 6: Put the lid on the slow cooker, plug it in, set in on LOW for 6-8 hours, then walk away. Works well overnight.
Step 7: Unplug the slow cooker, stir in the peas, and dish up a big ol' bowl of beefy goodness.

Enjoy!

Peanut Butter Oatmeal Cookies

Peanut Butter Oatmeal Cookies

Ingredients:
3/4 cup AP flour
1/2 cup whole wheat flour
2 cups old fashion rolled oats
3/4 cup butter, room temperature
1/2 cup peanut butter (I prefer using natural instead of the sugary stuff)
1 cup sugar
1/2 cup brown sugar, packed
1 tsp. baking powder
1/2 tsp. baking soda
2 eggs, room temperature
1 tsp. vanilla extract
optional add-ins: 1 cup chopped nuts/chocolate chips/peanut butter chips

Directions:
Preheat the oven to 375 degrees.

In a medium bowl, whisk together the flours and oats then set aside.

In a large bowl using an electric mixer (I suppose you could go old school on it and break out the wooden spoon if you really want to) cream together the butter, peanut butter, sugars, baking powder, and baking soda until well mixed. Add in the eggs, one at a time, and the vanilla, beating for another 1-2 minutes on medium speed. Stir in as much of the flour and oat mixture as you can using the electric mixer before switching to a wooden spoon to stir in the rest. Fold in whatever add-ins you want (I went with a mix of both dark chocolate chips AND peanut butter chips), then drop by the dough by rounded teaspoonful onto ungreased cookie sheets, leaving about an inch of space between each cookie. Bake at 375 degrees for 10-12 minutes, until golden brown and set. Remove cookies to a wire rack to cool for several minutes before diving in.

Enjoy!

Monday, November 12, 2012

Easy Sausage Cassoulet

I've been talking with one of my co-workers about having a kitchen play-date for some time now and it finally happened yesterday. When asked what she wanted to make, her first suggestion was something with lamb (yuck!) which I quickly nixed, but then her next suggestion was a cassoulet. Now, I've made cassoulet before in my slow-cooker, with chicken and smoked sausage. It was good, but this version with the Italian sausage was fantastic! Traditional cassoulet is usually made with rich ingredients like duck confit, duck sausages, or other gamey ingredients cooked slowly together to make for a final dish very complex in flavor.

Yeah, that is sooooo not my style of cooking.

While not exactly quick cooking, at least this particular variation of the dish is easy to put together and uses ingredients commonly found in any grocery store. As a matter of fact, I keep ALL of these ingredients in my pantry/freezer on a regular basis so really, it couldn't have been any easier. ;)

Easy Sausage Cassoulet

sausage cassoulet with breadcrumb topping
Ingredients:
1 Tbs. olive oil
6 Italian sausage links, pricked with a fork* (sweet or hot, dealer's choice)
1 large onion, thinly sliced into half-moons
3 ribs of celery, diced
1 bay leaf
1 tsp. dried rosemary, crushed
1 tsp. dried thyme
1 tsp. herbes de provence
1 Tbs. dried parsley
1 tsp. garlic powder (as always, you can use fresh if you prefer)
1/2 tsp. dried oregano
salt & pepper to taste (heavier on the pepper is best)
1 (14.5 ounce) can of tomatoes (stewed, diced, or fire-roasted)
4 cups chicken stock
2 (15.5 ounce) cans of cannellini beans, drained and rinsed
2" piece of parmesan rind or 2 Tbs. parmesan, grated (yes, the stuff from the green works very well here)

2-3 slices of whole grain bread, diced and crumbled (stale bread works best)
1 Tbs. extra virgin olive oil
2 tsp. coarse sea salt
1 tsp. dried rosemary, crushed
1 tsp. garlic powder

Directions:
In a large dutch oven (or heavy bottom pot) over medium-low heat, cook the Italian sausages in olive oil until browned on all sides and almost cooked through, about 8-10 minutes. (*THIS is why you need to prick the sausages all over with a fork; as they cook, some of the fat will render out which adds to the taste of the dish.) Remove the mostly cooked sausages from the pot and set aside, leaving the oil in the pot.

Dump the onions and celery into the pot and cook until slightly softened, about 5-7 minutes. Stir in all the spices and salt & pepper, continuing to cook for another few minutes before adding the canned tomatoes with their juice as well as the chicken stock. Raise the heat to medium-high and bring the stew to a simmer, stirring occasionally. Slice the Italian sausages on the bias into about 1/4" pieces before adding them back to the stew. Stir in the beans and parmesan, reducing the heat to low. Simmer the cassoulet for 35-45 minutes or until the liquid reduces somewhat and the beans start to release their starch.

Meanwhile, toss the bread cubes in the olive oil and spices, spread out in a single layer on a baking sheet, and bake at 350 degrees until crispy, golden brown, about 6-8 minutes.

To serve, ladle the cassoulet into a deep bowl and top with a handful of the breadcrumbs. We rounded out the meal with a nice spinach salad and some homemade rosemary & sea salt foccaccia... yum!

Enjoy!

********************************************************************************************************************

A few too many cocktails (vodka-cranberry, my favorite) led my sous-chef to take a bit of an impromptu nap before dinner even hit the table. I took that as a sign of a fun afternoon.
Next time, I will play bartender and maybe not use such a, um, generous pour. Although I have to say, cassoulet is a great dish to soak up an excess of alcohol... but then you're in danger of warm, full-belly syndrome. Oh well, c'est la vie, right? ;)

Thursday, November 8, 2012

Veggie Stir Fry

Veggie Stir Fry

veggie stir fry with tofu
Ingredients:
2 Tbs. cold water
1 1/2 tsp. corn starch
2 Tbs. soy sauce
1 Tbs. sugar
1 Tbs. dry sherry or orange juice
1/4 tsp. red pepper flakes
1/2 tsp. ginger (ground or fresh)
1/2 tsp. garlic (powder or fresh)
1 Tbs. vegetable oil
1 (10 ounce bag) mixed veggies (gotta love those frozen vegs! I had a bag of "Asian Vegs" in the freezer that included onions, carrots, broccoli, green beans, red peppers, and water chestnuts)
protein of choice

Directions:
Combine the corn starch and cold water, whisking until the corn starch dissolves. Yes, it really needs to be COLD water, otherwise the corn starch will just clump up on you. Stir in the soy sauce, sugar, sherry/orange juice, and spices then set aside.

In a large saute pan (or wok) over medium-high heat, cook the veggies in the oil until heated through yet still crisp. (If you use a bag of vegs straight from the freezer like I did, start the vegs in a dry pan- no oil- and put a lid on it to steam the vegs for about 3-5 minutes before uncovering, adding the oil, and commencing the actual "stir fry" process.) Once the vegs are tender-crisp, move them to the outside edges of the pan to create a well in the center. Pour the sauce into the center of the pan, stirring until thickened, about 1 minute. After the sauce has thickened, go ahead and pull the vegs back into the mix and toss to combine. Add your protein of choice (chicken, beef, pork, shrimp, or tofu) or keep it as is.

Enjoy!

Wednesday, November 7, 2012

Quick Black Bean Soup

Quick Black Bean Soup

black bean soup with smoked turkey sausage
Ingredients:
1 Tbs. olive oil
1/2 small onion, diced
1 rib of celery, diced
1 tsp. dried cumin
pinch of red pepper flakes (of course, you can use more if you want spicy soup)
salt & pepper to taste
2 (15.5 ounce) cans of black beans, drained and rinsed
4 cups vegetable stock
lime juice (optional)
sour cream (optional)
protein of choice (optional)

Directions:
In a soup pot over medium-low heat, saute the onion, celery, cumin, red pepper flakes, and salt & pepper in olive oil until slightly softened, about 3-5 minutes. Add in the beans and stock, and simmer for 10-15 minutes. Using an immersion blender (or you can remove part of the soup to a blender), buzz the soup to your desired consistency. Finish with your choice of toppings; I went with a squirt of lime juice and some smoked turkey sausage I had leftover from another meal.

Enjoy!

Sunday, November 4, 2012

Chocolate Sorbet

Mission accomplished: I successfully made chocolate sorbet WITHOUT an ice cream maker. It was a pain in the ass, but I did it. I pulled elements from several different recipes until I ended up with an incredibly rich tasting, chocolatey base that wasn't too sweet.

Chocolate Sorbet

Ingredients:
1 1/2 cups of water
1 cup sugar
3/4 cup cocoa powder
3/4 cup of previously brewed coffee
pinch of salt
1/2 tsp. vanilla extract
1 Tbs. chocolate liquer (coffee liquer would be good too)
1/2 cup (about 4 ounces) of dark chocolate chips, chopped finely

Directions:
In a heavy bottom pot over medium-high heat, bring the water, sugar, and cocoa powder to a boil, stirring frequently with a whisk. Once the sugar and cocoa have dissolved, continue cooking for another minute until the mixture thickens slightly. Remove from the heat and stir in the remaining ingredients before pouring your sorbet base into a freezer-safe container.

Now at this point, nearly every recipe I found tells you to follow the manufacturer instructions on your ice cream maker and you'll end up with a velvety sorbet in under an hour. So. To compensate for the lack of this vital piece of equipment, I had to determine HOW it worked and that way I could replicate this process manually. Easy enough, right? (Yeah, I know: I'm a nerd.)

Essentially, an ice cream maker churns the base as it freezes which keeps the formation of ice crystals to a minimum; there are still crystals, of course, but they're really fine which makes for a smoother texture. It also incorporates air into the mixture as it freezes which, again, lends itself to a silky texture. Soooo... how to do this by hand? I didn't want to end up with a solid block of chocolate flavored ice and that's what would happen if I just poured the base into a container and popped it in the freezer. Instead, every 45-60 minutes, I used a whisk to break up the forming ice crystals and whip air into the base as it was freezing. Because I was doing this by hand, it took about 6 hours and just as many sessions with the whisk before it reached the texture I was shooting for, but O. M. G. was it worth it!

Enjoy!

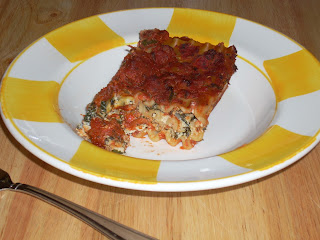
Spinach Lasagna Rolls

It's not often that I go to the effort of making a lasagna because I really only want one serving of it... even though you need to make an entire pan of it to get that single serving. When I do make lasagna, I prefer to use the no-boil noodles because it really does simplify the process and you can't tell the difference (texture-wise) if you use enough sauce and make sure to cover it while baking. Anyway, it shouldn't be surprising that I make these lasagna rolls much less frequently because of the simple fact that they're fairly labor intensive. It's not that any one step is difficult, per se, but there's just so damn many of them that it's not exactly something you can throw together on the fly or at the last minute.


Spinach Lasagna Rolls

Ingredients:
6 dried lasagna noodles (NOT the no-boil kind)
recently boiled kettle of water (you got it- need to go old school on this technique)
2 cups of your favorite marinara (homemade or jarred, whatever you've got on hand)
10 ounces of spinach (fresh or frozen)
1 small onion, diced (I actually used a shallot)
1 tsp. garlic powder (or fresh, if you insist)
salt & pepper to taste
pinch of nutmeg
15 ounces of ricotta cheese (I use the reduced-fat kind, but you can use the full fat stuff if you prefer)
1 egg, beaten
1/2 cup parmesan cheese (in this case, the stuff from the green can works just as well as freshly grated)
1/2 cup of shredded mozzarella (again, I used the reduced-fat kind)
1 Tbs. dried basil (I would normally say to use fresh, but in baked dishes like this, it really doesn't make a huge difference)
1 Tbs. dried parsley (same goes)

Directions:
Preheat oven to 375 degrees.

Arrange the dried lasagna noodles in a single layer in 1 or 2 baking dishes (depending on the size of your dishes- I had to use two 13"x 9" pans) and pour the recently boiled water over them, enough to cover by about an inch. Why not just boil the noodles in a pot like the directions of the box say to? Well, this way, the noodles stay separated (tend to stick together in a pot of boiling water), you don't have to go through the hassle of draining them and then oiling them and laying them out flat to prevent sticking. Plus, they'll be just shy of al dente which means they're pliable enough to roll, but then they won't get too soft in the final baked dish.

Meanwhile, in a saute pan over medium-low heat, cook the onion, spinach, garlic powder, salt & pepper, and nutmeg in olive oil until the onion is softened and the spinach is wilted, about 5-7 minutes. Set aside to cool.

In a large bowl, stir together the ricotta, egg, parmesan, mozzarella, basil and parsley. Once the spinach mixture has cooled, add it to the cheese mixture and blend well.

To assemble the lasagna rolls: Pour 1 cup of marinara in the bottom of an 8" x 8" square baking dish. Remove the noodles from the water and lay flat on your work surface. Spoon 1/4 cup of the cheese & spinach mixture onto the noodle and spread it out in a thin-ish (yes, I said thin-ish) layer over 2/3 of the noodle before rolling it up. Why not cover the entire noodle? As soon as you start rolling, the mixture spreads down the noodle and if you were to cover the entire noodle, it would just squirt out the end as you completed the roll; trust me, this amount of filling works well.

Lay the rolls seam-side down in the baking dish. Spoon any leftover spinach & cheese mixture in the space between the 2 rows of rolls (this size pan is perfect for 2 rows of 3 rolls each), then cover the lasagna rolls with another cup of marinara. Sprinkle on more parmesan or shredded mozzarella if desired, cover with foil, and bake at 375 degrees for 20 minutes before removing the foil and continuing to bake, uncovered, for another 15-20 minutes until the top is nicely browned. Allow the lasagna rolls to cool for at least 15 minutes before serving.

Enjoy!

Thursday, November 1, 2012

Veggie Lentil Soup

Veggie Lentil Soup

Ingredients:
1 Tbs. olive oil
1 small onion, diced
1 carrot, diced
1 rib of celery, diced
4 ounces of spinach (fresh or frozen)
1 cup par-cooked lentils
1 bay leaf
1 tsp. dried thyme
1 tsp. dried rosemary, crushed
1 tsp. garlic powder
1/2 tsp. dried dill
salt & pepper to taste
4 cups vegetable stock
2 cups V-8 juice (plain tomato juice or even tomato sauce would work)

Directions:
Saute the vegs in the olive oil over medium heat for 5-7 minutes until slightly softened before adding in all spices and continuing to cook for another 2-3 minutes. Pour in the veg stock and V-8 juice, reduce heat to low, add the *par-cooked lentils and simmer for 10-15 minutes or until the lentils are tender.

Enjoy!

*For the par-cooked lentils, in a separate pot, boil 1/4 cup of lentils with 1 cup of water for 15 minutes then reduce the heat to low and simmer for another 15 minutes. The lentils won't be completely cooked at this point, but they should be not quite al dente. Better yet, if you make a pot of lentils and have leftover, just toss those into the soup at the last minute.